First Encounter. 1/35
- Inka

- Nov 16, 2025
- 4 min read

Here is another one of my old dioramas I had half forgotten about. I made it some fifteen years ago while I was having a job at the exellent Lofoten Krigsminnemuseum (Lofoten War Museum) in Svolvær.
I spent much of my spare time there bunker crawling in some of the countless installations the germans littered the area with during their occupation, and since I have been interested in WW2 since childhood I guess it counts as a semi self biographical diorama.
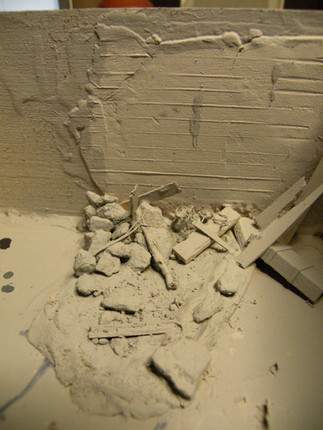
The idea to make a bunker diorama came to me as I was tossing away some styrofoam packaging, and saw a piece that could resemble a bunker entrance.
I brought the styrofoam to my workbench, cut it to size and started opening drawers and boxes hunting for something to use as concrete.
The choice fell on some DAS clay which I rolled flat until it was a few milimeter thick, and used PVA glue to stick it to the styrofoam.
Before it cured I made a small "wall" from balsafoam planks which I pressed into the still soft clay to produce the look and texture the wooden formwork gave to the real bunkers.


As this was drying over the next few days I began playing around with base- and groundwork. I had a small square frame, and built it up with sidewalls using balsa sheets and cut them to the shape I wanted.
Now I could decide the placement of the bunker and begin tinkering with the groundwork, which I wanted to look like lush nature in a warm Northern Norwegian summer. A natural choice since the snowstorms were raging outside my windows.
Nature is also very difficult to model, and I wanted to challenge- and develop my diorama skills.

With a few rocks, twigs and wire bits I made some clutter that one often find inside bunker entrances that has been forgotten by time. I painted it up and made the floor looking wet using some resin "water".
Now I could attach the bunker and do the rest of the groundwork. But before that I painted the bunker, and detailed it a bit with patches of moss on its roof.


I built up the ground using Oasis florist foam and PVA, and since the german engineers were masters of integrating their bunkers with the nature, I cast with gypsum pieces of "mountain" from some rubber molds and placed on one side of the bunker.
On the other side I made a rock filling with gravel I collected by the bank of the fjord.
When the florists foam had dried I gave it a thin cover of DAS clay which I textured a little by rolling a ball with silverfoil across it.

Now the real fun could begin.
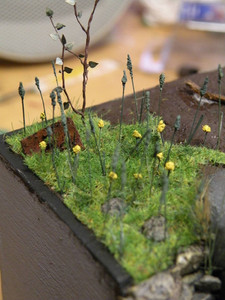
I brought out the paint and gave the ground a dark brown soil color, and followed that by gluing "grass" to the ground.
Then I made a shrubbery using twigs from the garden. I put glue on the tips of the twigs and rolled them in ground up green rubber so that it looked like small leafs. I had some photoetched ferns and other plants I had to twist and bend into shape and try to paint convincingly.


It started to look like something one could see in nature, but it was still too empty. I looked around my on my desk and spotted a dry old paintbrush, it was green from another project. This would be perfect for straws and flowers, so I cut of a pinch, dipped the tips in glue and dipped them in fine chinchilla sand,,tadaaam, straws! I repeated the process but now used fine sawdust insread of sand, and it gave a different look, and with a dab of yellow paint I had nice looking flowers.
After days of adding more and more of the straws and flowers and other small details, like sapplings made from wires, the nature began looking quite good.


Early into the work I had realized it would be empty without a figure, so I decided to put a miniature-myself into the bunker entrance.
The figure I landed on was of a young boy from the french figure company MK35. He was supposed to be part of another scene so his pose was a bit off, but I camoflaged that by adding a helmet to his, erm, my hand, which he, I, had found inside the bunker. A dream I had as a kid, but which never happened.


As soon as the acrylic paint had dried I could glue the figure in place. Now all what was left was checking for any faults or errors and print out a small sign, laminate it and glue it to the base, and call it done.
I still have this diorama tucked away in a storage box, but as soon as I can fit one more display cabinet to my room I will put it on display.
Now it is time for either a coffee, or go outside and remove snow,,what would you choose?
Thanks for reading. I wish you a great week :)


Comments