Waiting Treasure. 1/35
- Inka

- Mar 8
- 5 min read
Updated: Mar 11

How many of us history buffs have not dreamt of finding leftovers from past times,
finding ourselves in deep thought, travelling back in time when visiting a historic
site, and daydreaming about the olden days while walking through a forest?
I am certainly like this, and I am lucky enough to live in an area that is rich with
reminders of the past, and covered with forest.
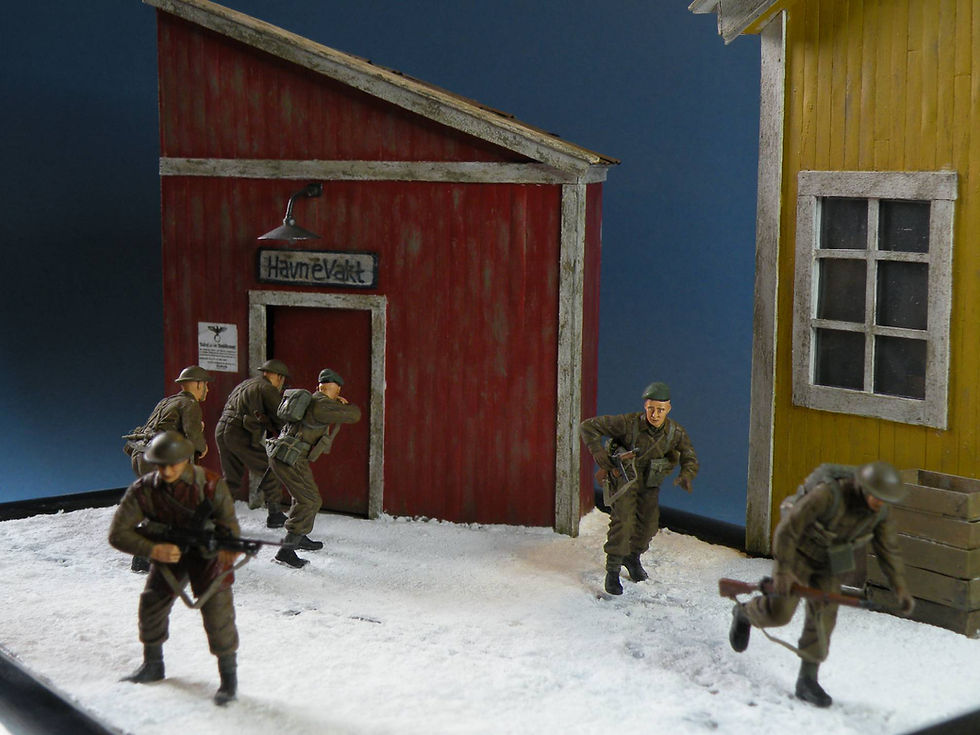
I have made a little diorama of one of these daydreams. A hidden treasure in the forest, a place I would love to stumble across.

The idea came to me one evening after I had spent the day in the woods around a site from the war where tons of geman gasmask containers had been dumped. I just had to start working on my idea so I pulled up a wooden frame and some sheets of balsa wood from my modelling stash.
Quickly I made quite tall walls from the balsa sheets to raise the scene up, and secured them
firmly to the frame. Next I took some Oasis Florist foam, put some PVA glue to the bottom of the base and insides of the balsa sheet walls and stuck the Oasis in place. As soon as this had cured I used a scalpel blade to cut and form the top of the balsa walls. With my fingers I shaped the foam to the desired look, following the lines of the base walls.
Now I began looking for parts I needed to fill the scene with. I made 3-4 lengths of flower sticks which were to become pine trees. I also found a few dinged up fuel barrels from a MiniArt kit, which I pressed into the base in front of the trees.
Then followed two evenings where I took my entire stash of German 1/35 scale helmets and
cleaned them up before pressing them into the base as well.
A few grenade crates and other junk also found their way into the florist foam. When I was happy with the placement of the different objects I thinned some PVA glue and soaked the Oasis foam and put it aside to dry. To secure the helmets to eachother I ran liquid poly over them.


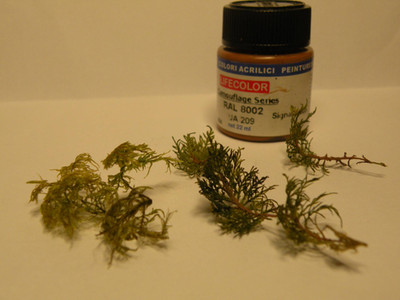
I had no idea how I would make the pine trees, but I started shaping them with a knife and I used a micro saw to produce a bark effect on the trunk, kinda scraping it upwards the stem. From Lifecolors Rotbraun (UA205) and Signalbraun (UA209) I mixed a suitable colour and
painted the bare tree trunks. Following this I gave it a few black washes.
I resorted to Google searches to try find a solution on how to make the branches. The answer was moss, and I didn't need to go far to locate some either. It lived tons of it in the forest next to my house.
A day later the moss I picked up had dried, and I started sorting out pieces I could use. When the pile was large enough I started painting. Lifecolors Olivegrün (UA206) first, then I picked out the branches with the same mix as for the trunks.


Before the paint was 100% dry I started gluing them to the trees, because they were more flexible and easier to work with like this. Working from top to bottom. I used a good fast drying CA gel making it pretty easy to attach the branches.
Another trip to the forest for more moss was called for before I could give the trees a final coat of hairspray to secure it all.
During the making of the trees I decided which figures to use and what to really make of the scene, and ordered them online. Waiting for the figures I began painting the rest of the diorama.
I primed the whole thing black, and found my model colours. With Vallejo Modelcolor # 886, 830, and 975 I mixed three tones of helmet green and went to work.
All the stuff stuck in the groundwork got a coat. Later I stuck national shield decals from Alliance Modelworks to a few of the helmets. As for the barrels I used aluminium paint from an old Humbrol can. I have often seen these barrels in nature, some rusted to pieces although some have survived in a surprisingly good condition, and I wanted that well preserved look.
I weathered them with different coloured dots of oil paint which I blended and dragged off with a brush slightly moistened with thinner. I found rust coloured pigments and Vallejo paints and started ageing the helmets. The grenade boxes got the same treatment before I
gave everything several dark washes, blending it all together.


At this point it all looked very dark, naked and uniform but the moment I started sprinkling Forest-in-a-Pot from Reality-in-Scale over thinned PVA glue on the base it really came to life. Also the up-turned helmets got a dab of glue in it and a little vegetation put in. When all this sat nice and firm I added some straw, small bushes and fallen branches to add to the lush forest look.
Two boxes containing Mantis Miniatures products arrived in perfect time. I had chosen to place a fox from "Animals set 2 Europe" kit in the helmet pile, staring at two bunnies having a go at making tiny bunnies next to a tree stump, from "Animals Set 6".
Very small, but crisply detailed little figures, they sure were a lot of fun to paint. I used Vallejo Model colours to paint them, and I mixed the paint in a "wet-palette".
For the fox I used Light Orange (911) German Orange (805),Old Wood (310), GermanCamoBlack (822), White (951), PanzerAces Light Rust (301) and for the white on the fox and the bunny I mixed some Old Wood to it, to avoid using pure white.
The last bunny is mainly painted with Old Wood. When the paint was dry they each received a couple of dark washes and then I could fix them to the base using epoxy glue.


A few touch-ups here and there and a last inspection before I mixed more epoxy and finalized the job by securing the trees to the base.
I really enjoyed making this diorama. Spending about a week on it, it was one of my faster builds and I had no snags along the way. Getting it in to the display cabinet proved impossible though, as one of the trees was some millimetres too tall. I should have checked that one! We live and learn...and it was a perfect excuse for getting yet another display cabinet.
NowI'll have to find something to build that won't need German helmets!
Thanks for reading :)


Comments