We often get questions about how to clean rust with electrolysis, so we decided it was time to make a small article on how to do this. Andris L. has despite his young age many years of experience doing this so he made this write-up. The photos is from my set-up which is a bit simpler than Andris`, but they illustrate well how it is done..
So, first of all You need a source of DC current, car battery charger works the best. You need the simplest one, I use some Polish made, gives up to 20A. I added photo of very similar one, it need to be very simple, non digital, with arrow showing strength of current. Forgot to add, if there is written that it is automatic charger, it will not work.
Plastic bucket, or anything else made from durable plastic.
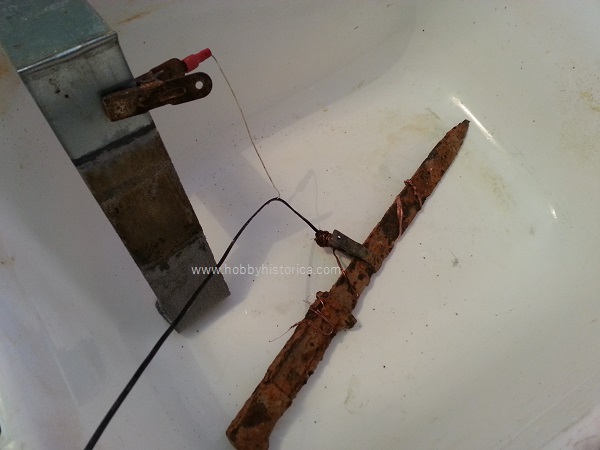
Piece of scrap metal, I use roof iron plate, bend it inside of bucket, so it covers walls, it gives electricity to get to Your object from all sides. It will be destroyed in process. Never use stainless steel or something chromed for sacrificial metal. Chrome will make solution poisonous. Use as pure iron as possible to clean iron or steel.
I prefer sheet metal instead of rods, work more effective, gives electricity from all around.
Calcinated soda (Na2CO3, sodium carbonate), I get it from chemistry shop, it allows water to conduct better than usually, never use table salt or You will get reenactment of Battle of Ypres, You will get chlorine gas. Using calcinated soda You get only oxygen and hydrogen coming out of bucket. I use around 2/3 of glass of crystals per bucket, You can easily add more, it depends on how strong is charger, for 6A charger use less, for 20A more. You need to look at arrow in the process.
So, first of all You need a source of DC current, car battery charger works the best. You need the simplest one, I use some Polish made, gives up to 20A. I added photo of very similar one, it need to be very simple, non digital, with arrow showing strength of current. Forgot to add, if there is written that it is automatic charger, it will not work.
Plastic bucket, or anything else made from durable plastic.
Piece of scrap metal, I use roof iron plate, bend it inside of bucket, so it covers walls, it gives electricity to get to Your object from all sides. It will be destroyed in process. Never use stainless steel or something chromed for sacrificial metal. Chrome will make solution poisonous. Use as pure iron as possible to clean iron or steel.
I prefer sheet metal instead of rods, work more effective, gives electricity from all around.
Calcinated soda (Na2CO3, sodium carbonate), I get it from chemistry shop, it allows water to conduct better than usually, never use table salt or You will get reenactment of Battle of Ypres, You will get chlorine gas. Using calcinated soda You get only oxygen and hydrogen coming out of bucket. I use around 2/3 of glass of crystals per bucket, You can easily add more, it depends on how strong is charger, for 6A charger use less, for 20A more. You need to look at arrow in the process.

You will have two crocodile clamps, (-) goes to relic, (+) goes to sacrificial metal. (-) can be in solution, but if (+) gets in solution it will be destroyed. (+) usually is on red wire. Attachment point need to be clean metal, so I file some small spot through rust to get shiny metal to attach crocodile. You can make additional wires with small crocodiles on both ends to add more relics, one end attaches to some relic, another to main crocodile, relics can touch each other.
Throw relic in water, it can touch plastic, but it can't touch sacrificial metal.
Turn on and look what happens, if You are able to regulate voltage turn it on minimal before starting. You may burn down a few fuses before you get it right, so take a charger with car fuses, they are cheap and easy to change.
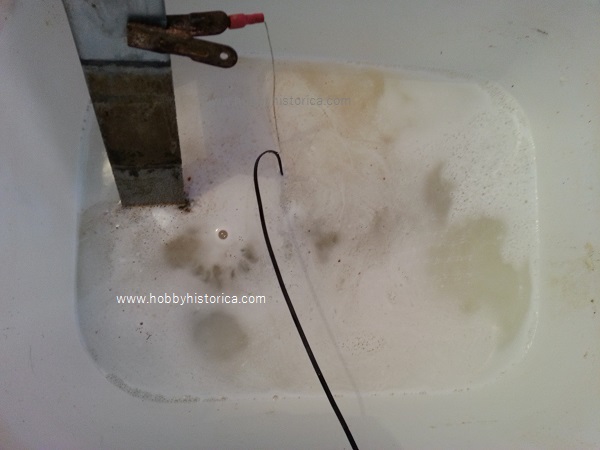
For example if charger is 6A, don't let it go over 5A, if it is too much, take away some water and add fresh water, but don't add soda. If You need more add soda.
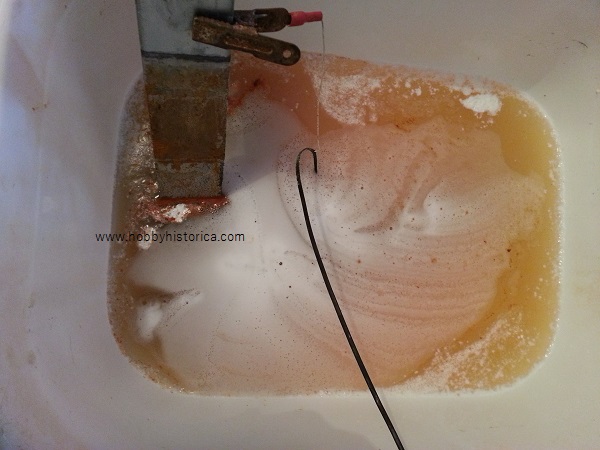
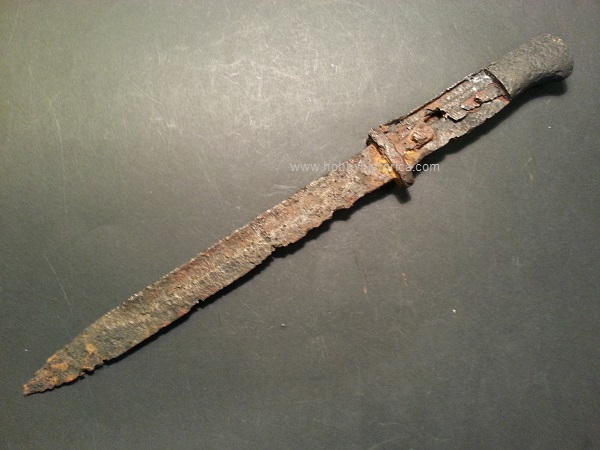
I usually turn it on in evening and in morning I turn it off. Take out the piece, I suggest using waterproof gloves, rust will turn to very fine black dust. Brush it with stiff steel wire and rinse with good amount of water to wash off calcinated soda.
Dry it and coat with something, hot wax,laquer, almost anything which prevents air to get on relic, or try the preservation wax we are making, http://www.hobbyhistorica.com/the-workbench/hobbyhistoricas-preservation-wax
Hope this helps, and should you have any questions feel free to drop us a mail :)
-Andris and Inka.
-Andris and Inka.
 RSS Feed